How to Clean Your Aircond Filter: Step-by-Step Guide
Cleaning your AC filter is the easiest way to maintain efficiency. Learn how to do it properly in this simple guide.
How to Clean Your Aircond Filter: Step-by-Step Guide
You check your TNB bill and something feels off. The total keeps climbing month after month, yet nothing in your daily routine has changed.
For many homeowners across Kepong and greater Kuala Lumpur, a clogged aircond filter is the hidden reason behind those unexplained electricity spikes.
A blocked filter forces your unit to work significantly harder just to circulate the same volume of cool air, driving power consumption up by 15% to 25% according to recent HVAC efficiency research.
Based on years of servicing units throughout Kepong, regular standard aircond cleaning remains the single most impactful step you can take to bring down your monthly bill without giving up comfort.
Below, we cover why this matters so much in our tropical climate, the stubborn “jelly” problem unique to humid environments, and the exact process to get your filter spotless today.
Why Filter Cleaning Matters (Real Data)
Your aircond filter traps dust, pollen, and the fine particulate matter that fills the air in busy urban neighborhoods like Taman Kepong and Kepong Baru.
Once that mesh gets clogged, the consequences show up quickly on your bill:
- Airflow is restricted: The blower fan has to spin faster and run longer to push the same volume of air through the room.
- Electricity spikes: Research on HVAC systems in tropical climates shows that a dirty filter can raise energy consumption by 15-25%.
- Cooling drops: The air blowing out feels “weak” and tepid even when you set the thermostat down to 16°C.
- Biofilm formation: In Malaysia’s persistent 80%+ humidity, dust particles bind with moisture on the coils to form a “white jelly” or biofilm that gradually blocks drainage pipes.
The financial reality: If your household falls into TNB’s higher tariff tier (paying 57.10 sen/kWh), a dirty 1.5HP aircond running 8 hours daily could be wasting roughly RM30 per month just forcing air through a layer of accumulated dust.
What You’ll Need
You do not need a full toolbox to get this done.
CoolBreeze technicians rely on these simple items for a basic filter service:
- Sturdy Step Stool or Ladder: A must for the high ceilings found in many terrace houses and condominiums around Kepong.
- Mild Dish Soap: Everyday brands like Glo or Sunlight are effective; steer clear of harsh chemical cleaners.
- Soft Cloth or Sponge: For wiping down the front panel after removing the filter.
- Vacuum with Brush Attachment: Optional, but ideal for lifting the “fuzzy” dust layer before you wet the filter.
Step-by-Step Filter Cleaning
Step 1: Turn Off the Power Source
Pressing the remote’s off button is not sufficient for safe handling.
Always flip the isolator switch, the white switch typically mounted on the wall beside your indoor unit, to the “OFF” position.
This cuts all electrical current to the unit while you work on it.
Step 2: Open the Front Panel
Look for the small indentations or tabs on either side of the indoor unit.
For the most popular brands in Malaysian homes, such as Panasonic, Daikin, and York:
- Place both hands on the sides of the panel.
- Pull it gently toward you and then lift upward.
- Push it up until it locks into the “hold” position (you will hear a soft click).
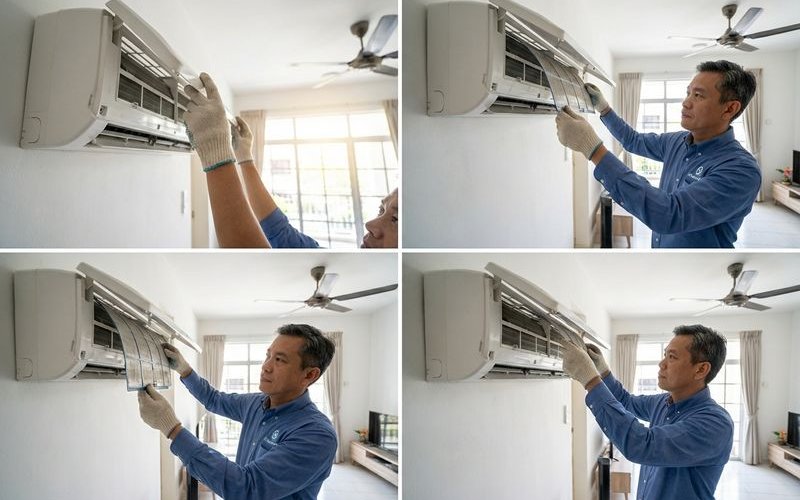
Step 3: Remove the Filters
You will usually see two curved mesh screens sitting over the evaporator coils.
Handle these with care, as the plastic mesh tends to become brittle on units that are more than 5 years old:
- Find the small tab at the bottom centre of the filter.
- Push the filter slightly up to unhook it from the holding clips.
- Pull it gently down and toward you to slide it free.
Step 4: Check for “Jelly” and Damage
Before rinsing anything, examine the mesh and the area behind it closely.
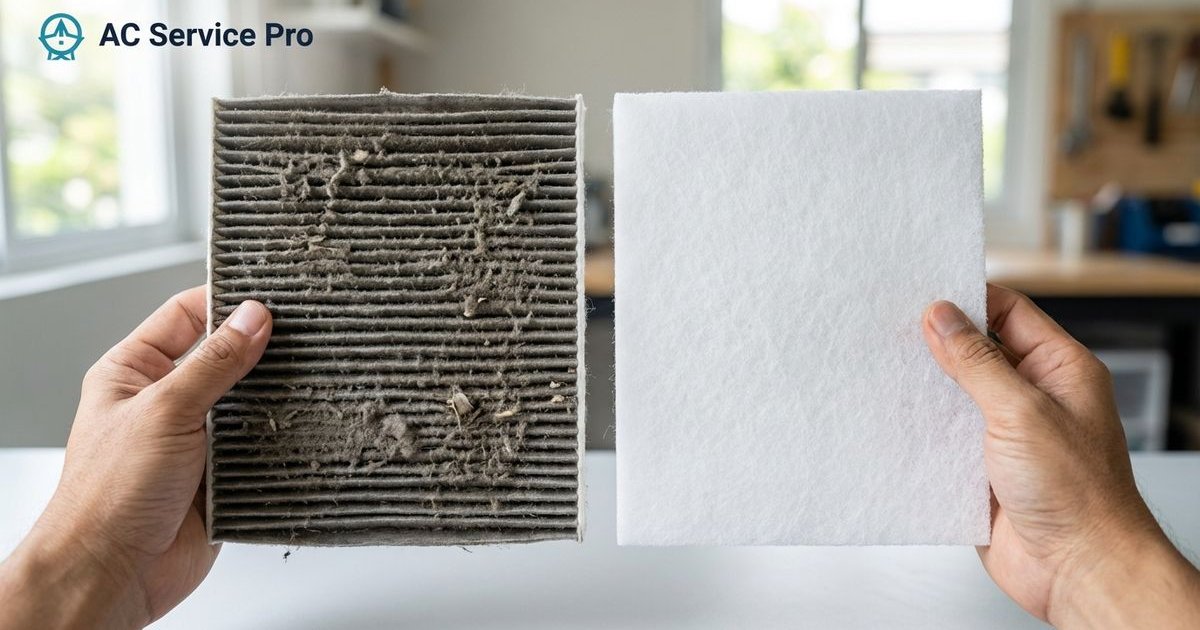
If you spot a clear, slimy substance (biofilm) or thick black patches on the silver coils behind the filter, a basic filter wash will not solve the problem.
This kind of buildup indicates bacterial growth that calls for a professional chemical wash.
Step 5: Clean the Filter
For light dry dust:
- Run a vacuum cleaner with a brush attachment across the front of the filter.
- Alternatively, bring it outdoors and tap it gently against a solid surface.
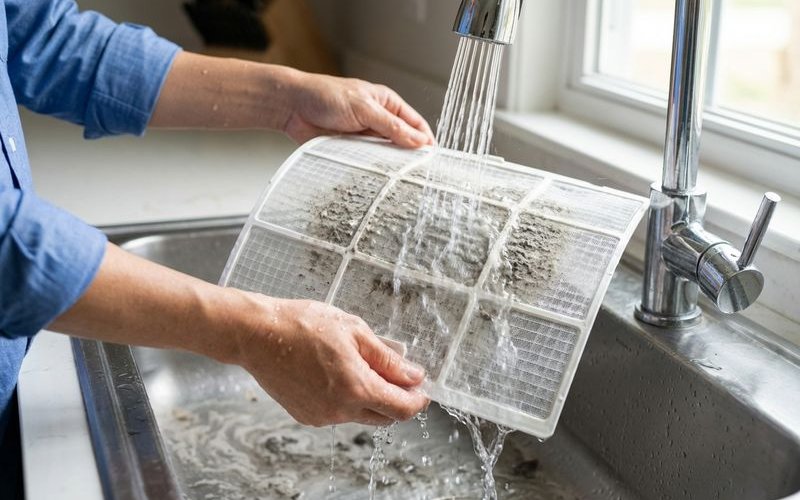
For sticky or greasy dust (common near kitchens or busy roads):
- Carry the filters to your bathroom or kitchen sink.
- Run cool water through the filter from the back side (opposite to the normal airflow direction) to push trapped dust outward.
- Add a drop of dish soap to the water and gently wash the mesh with your hand or a soft sponge.
- Rinse thoroughly until all soap bubbles are gone.
Step 6: Dry the Filter Completely
This is the most critical step for homes in Malaysia’s tropical climate.
Our persistently humid air slows evaporation, and reinstalling a damp filter creates the perfect conditions for mold to take hold almost immediately.
Correct Drying Methods:
- Lean the filters against a wall in a shaded, breezy area (a balcony or covered yard works well).
- Point a standing fan at them to speed up drying.
- Pat them down with a microfiber towel to remove excess water.
What to Avoid:
- Never place filters under direct afternoon sun. The intense UV and heat can warp the plastic frame, making it impossible to fit back into the unit.
- Never blast them with a hair dryer on its highest heat setting.
Step 7: Reinstall the Filter
Once the mesh is completely dry:
- Slide the filter back into the upper tracks.
- Push it up until the bottom tabs click securely behind the holding hooks.
- Close the front panel and press firmly at the centre and on both sides to lock it in place.
Step 8: Test the Airflow
Switch the isolator back on and start your aircond.
You should feel a noticeably stronger breeze right away, confirming that the fan is no longer fighting against a blocked filter.
How Often Should You Clean?
Cleaning once a month is a solid general rule, but local conditions in Kepong and surrounding areas can shift that frequency.
Here is a schedule based on the air quality situations the CoolBreeze Aircond Services team encounters most often:
| Environment | Recommended Frequency | Why? |
|---|---|---|
| Normal Residential | Every 3-4 Weeks | Maintains standard efficiency. |
| Near Main Roads | Every 2 Weeks | Exhaust fumes create sticky, black dust. |
| Active Construction Area | Every 1-2 Weeks | Fine cement dust clogs filters rapidly. |
| Haze Season | Every 1-2 Weeks | High particulate matter blocks airflow fast. |
| Pets (Cats/Dogs) | Every 2 Weeks | Pet hair and dander form a thick mat. |
| Guest Room (Rarely Used) | Every 6-8 Weeks | Dust accumulates even when not in use. |
Pro Tip: Sync your cleaning schedule with the date your TNB bill arrives so you never miss a session.
Common Mistakes to Avoid
❌ Scrubbing with Hard Brushes
The mesh on modern units (particularly newer Daikin or Acson models) is extremely fine. Aggressive scrubbing can tear the antibacterial coating or puncture the mesh itself.
❌ Using Hot Water
Hot water causes the thin plastic frame to soften and warp. Once deformed, the filter will no longer seal the unit properly, allowing dust to bypass it and coat your internal blower.
❌ Ignoring the Tops of the Unit
Many homeowners clean the filter diligently but forget to wipe the top surface of the indoor unit. Dust accumulates there and gets pulled straight back in the moment you power the system on.
When to Replace Instead of Clean
Filters are built to last, but they are not permanent.
Consider purchasing a replacement if you notice:
- Tears or holes: Even a tiny opening lets dust coat your evaporator coils directly.
- Permanent sagging: The mesh no longer sits taut within its frame.
- Unremovable mold: Dark spots that refuse to come off even after thorough scrubbing with soap.
Replacement filters for standard wall-mounted split units typically cost between RM30 to RM60 at local hardware shops or online platforms like Shopee and Lazada.
DIY Cleaning vs. Professional Chemical Wash
Cleaning your filter is routine maintenance; a chemical wash is a full restoration.
If the filter looks clean but the air still carries a musty odour or your room is not getting cold, you likely need a professional deep clean.
| Feature | DIY Filter Cleaning | Professional Chemical Wash |
|---|---|---|
| Cost | Free | RM 120 - RM 180 (Avg. for 1.0-1.5HP) |
| What Gets Cleaned | Front mesh filters only | Filters, cooling coils, blower wheel, drainage pan |
| Removes Biofilm? | No | Yes (kills bacteria and mold) |
| Improves Airflow? | Yes, slightly | Yes, significantly (restores factory performance) |
| Frequency | Monthly | Every 12-18 months |
Make It a Habit
The toughest part of filter maintenance is simply remembering to do it.
Set a recurring reminder on your phone for the first Sunday of every month.
Spending 10 minutes washing your filters is the easiest way to save RM30 or more each month on electricity that would otherwise go to waste pushing air through dust.
Need Professional Help?
If you have cleaned your filters and the aircond still is not cooling properly, or if you notice water dripping from the unit, the blockage is likely deep inside the drainage system where a simple filter wash cannot reach.
Contact CoolBreeze Aircond Services for a professional inspection and chemical wash to restore your unit to peak performance.
Need Aircond Service?
10+ years experience. 5,200+ customers served. Free gas top-up with chemical wash.
WhatsApp Us Now